Rising energy costs have many homeowners overlooking an easy fix—window seals and weatherstripping. Damaged seals allow air leaks, forcing HVAC systems to work harder and increasing utility bills. Fortunately, addressing these issues is affordable and improves comfort and energy efficiency. This guide covers everything you need to know to maintain and optimize your windows for better performance and savings.
Understanding Window Seals and Weatherstripping
Window seals and weatherstripping serve as your home’s first line of defense against energy loss. While they might seem like minor components, these materials create crucial barriers that prevent air leakage around window frames and sashes.
Window seals are typically made of rubber, silicone, or foam materials that fill gaps between the window frame and the wall. They create an airtight barrier that prevents outdoor air from entering and conditioned indoor air from escaping. These seals are usually installed during window installation and may not be immediately visible from inside your home.
Weatherstripping, on the other hand, refers to materials applied to the movable parts of windows—such as where the sash meets the frame when the window closes. This includes the bottom rail, side jambs, and top rail of double-hung windows, as well as the perimeter of casement windows.
Both components work together to create a comprehensive seal system. When properly installed and maintained, they can significantly reduce air infiltration, which accounts for up to 40% of a home’s heating and cooling costs according to the Department of Energy.
Types of Window Seals and Weatherstripping
Different types of seals and weatherstripping materials offer varying levels of durability, effectiveness, and cost. Understanding your options helps you make the best choice for your specific situation and budget.
Foam Weatherstripping
Foam strips are among the most affordable and easiest to install options. They compress when the window closes, creating a seal against air leakage. However, foam weatherstripping typically has the shortest lifespan and may need replacement every one to three years. It works best for windows that aren’t frequently opened and closed.
Rubber and EPDM Seals
Rubber seals, particularly those made from EPDM (ethylene propylene diene monomer), offer excellent durability and weather resistance. They maintain their flexibility across a wide temperature range and can last 10-15 years with proper maintenance. These seals are commonly found in quality replacement windows like those in Logan, Utah, and other regions with extreme temperature variations.
Silicone Seals
Silicone weatherstripping provides superior longevity and maintains its flexibility even in harsh weather conditions. While more expensive upfront, silicone seals often prove cost-effective over time due to their extended lifespan of 15-20 years.
V-Strip and Tension Seals
V-strip weatherstripping, also called tension seals, features a folded design that creates tension against the window frame. Made from materials like vinyl, aluminum, or stainless steel, these strips are highly effective at blocking air infiltration while allowing smooth window operation.
See also: Choosing the Right Energy-Efficient HVAC System for Your Home
How Window Seals and Weatherstripping Impact Energy Efficiency
The energy efficiency benefits of proper window sealing extend far beyond simply blocking drafts. These components create a controlled indoor environment that reduces the workload on your HVAC system in several key ways.
Air Infiltration Reduction is the most direct benefit. Gaps as small as 1/16 inch around a window can allow significant air leakage. Quality seals eliminate these gaps, preventing hot summer air from entering and warm winter air from escaping. This reduction in air exchange means your heating and cooling systems can maintain desired temperatures with less energy consumption.
Moisture Control represents another crucial advantage. Proper sealing prevents humid outdoor air from entering during summer months, reducing the moisture load on your air conditioning system. During winter, seals prevent warm, moist indoor air from escaping and condensing within wall cavities, which can lead to insulation damage and reduced effectiveness.
Temperature Stability improves throughout your home when windows are properly sealed. Consistent indoor temperatures mean your HVAC system operates more efficiently, cycling on and off less frequently. This not only saves energy but also extends the lifespan of your heating and cooling equipment.
The cumulative effect of these improvements can result in energy savings of 10-20% on heating and cooling costs, according to Energy Star. For the average American household, this translates to annual savings of $200-400.
Signs of Failing Seals and Weatherstripping
Recognizing when your window seals and weatherstripping need attention can help you address issues before they significantly impact your energy bills. Several telltale signs indicate it’s time for maintenance or replacement.
Visible Gaps around window frames are the most obvious indicator. Use a flashlight to inspect the perimeter of your windows, looking for spaces where daylight shows through. Pay particular attention to corners and junction points where different materials meet.
Drafts near windows signal compromised seals. On a windy day, hold your hand near the window frame to feel for air movement. You can also use a lit candle or incense stick—flickering flames or smoke movement indicates air infiltration.
Increased Energy Bills without corresponding changes in usage patterns may point to deteriorating window seals. Compare your energy consumption year-over-year to identify unusual increases that could result from air leakage.
Condensation Issues can signal seal problems. Excessive condensation between window panes indicates failed glazing seals, while condensation on window frames during winter suggests air leakage allowing humid outdoor air to contact cold surfaces.
Physical Deterioration of weatherstripping materials is often visible upon close inspection. Look for cracking, hardening, or compression set in foam materials. Rubber and silicone seals may show signs of shrinkage or separation from the window frame.
DIY vs. Professional Installation
The decision between DIY installation and hiring professionals depends on several factors, including the type of windows, complexity of the work, and your skill level.
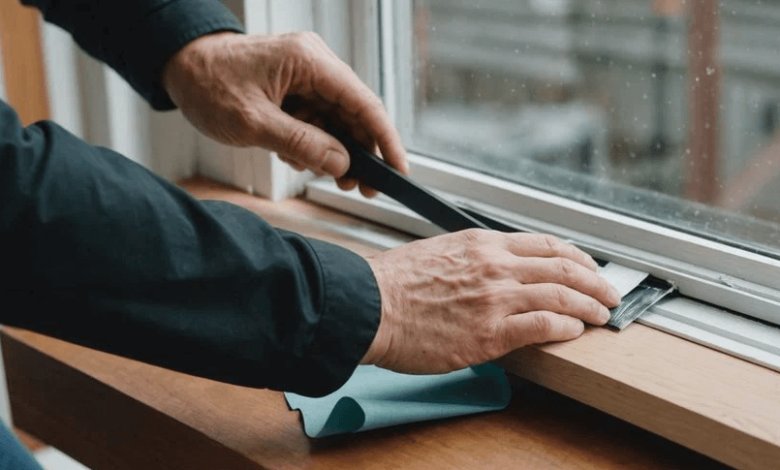
DIY Installation works well for simple weatherstripping replacement on standard windows. Foam strips, adhesive-backed rubber seals, and V-strip weatherstripping are generally straightforward to install with basic tools. This approach offers immediate cost savings and allows you to work on your schedule.
However, DIY installation requires careful attention to detail. Improper installation can actually worsen air leakage or interfere with window operation. Take accurate measurements, clean surfaces thoroughly before applying new materials, and ensure proper compression without over-tightening.
Professional Installation becomes advantageous for complex projects involving structural seals, custom-sized materials, or windows with unique configurations. Professionals have access to specialized tools and materials that may not be readily available to homeowners. They also provide warranties on their work and can identify additional issues that might not be apparent to untrained eyes.
Consider professional services when dealing with high-end windows, historical properties, or when multiple windows require attention simultaneously. The upfront cost often proves worthwhile when professional installation ensures optimal performance and longevity.
Maintenance Tips for Longevity
Proper maintenance extends the lifespan of window seals and weatherstripping while ensuring continued energy efficiency benefits. A proactive approach prevents small issues from developing into costly problems.
Regular Inspection should occur twice yearly, ideally during spring and fall. Check for signs of wear, damage, or separation. Document any issues with photos to track deterioration over time and plan replacement schedules.
Cleaning maintains the effectiveness of sealing materials. Use mild soap and water to remove dirt, debris, and pollutants that can degrade rubber and silicone compounds. Avoid harsh chemicals or abrasive cleaners that might damage the materials.
Lubrication of moving parts helps maintain proper seal compression. Apply silicone spray to vinyl and rubber weatherstripping to prevent hardening and cracking. This is particularly important for windows that are frequently opened and closed.
Prompt Repairs prevent minor issues from escalating. Replace small sections of damaged weatherstripping immediately rather than waiting for complete failure. Address caulk separation around window frames as soon as it’s noticed.
Seasonal Adjustments may be necessary for some types of weatherstripping. Compression seals might require slight adjustments as materials expand and contract with temperature changes.
Conclusion
Sealing windows with weatherstripping is a simple, cost-effective way to boost energy efficiency, lower heating and cooling costs, and improve comfort year-round. Choose the right materials for your climate, ensure proper installation, and maintain seals over time. Regular inspections and timely fixes can make a big difference for your energy bills and home comfort.